120VAC High-Low Tool/Light Switch
by technovative in Workshop > Tools
8240 Views, 88 Favorites, 0 Comments
120VAC High-Low Tool/Light Switch


A device for those moments when Mr. Scott is "Givin' you all she's got!" and all she's got is a little too much. This is a simple inline switched 120VAC outlet with a full power setting and a 50% power setting. A half wave rectifier diode facilitates the 50% power setting.
Practical Uses:
- High-Low temperature control for a soldering iron or hot glue gun.
- Bright-Dim control for an incandescent light.
Maximum recommended load for the circuit shown in this article = 100 Watts
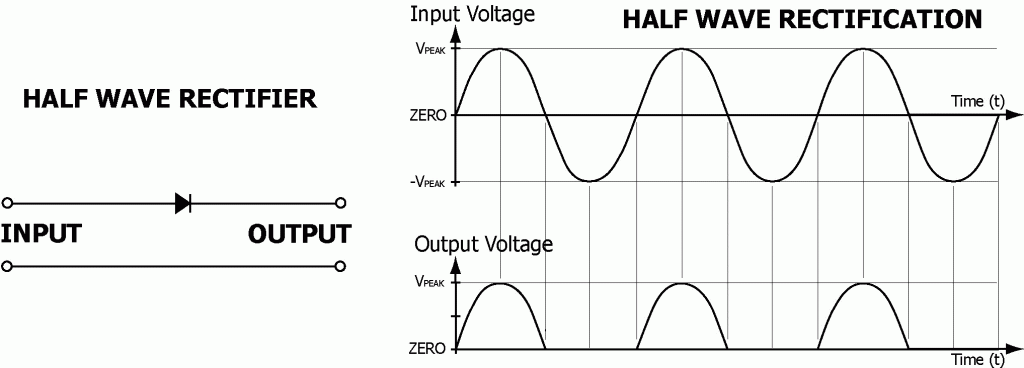
How does it work? The power grid in North America delivers alternating current electricity to homes and businesses at a frequency of 60 hertz (cycles per second), and when this energy is visually represented, it has a waveform known as a sine wave. This means that 60 times per second the direction that electricity is flowing alternates. A diode is an electrical component that acts as a one way valve and only allows electrical energy to flow one way through it. When a single diode is installed in one wire carrying AC power to a load, such as an incandescent lamp, it only allows approximately half of the power to reach the light. When this rectified waveform is analyzed, half of the sine wave will be missing because it is being blocked by the diode.

What You Need to Make It

- 1 - Lamp Cord with Plug
- 1 - SPST Switch rated for 250VAC and at least 3 Amps
- 1 - Lamp Cord Outlet/Connector
- 1 - IN4004 Diode
- 1 - Small Plastic Pill Bottle
- Electrical Tape or Heat Shrink Tubing
Tools:
- Soldering Iron & Solder
- Wire Cutters & Strippers
- Screw Drivers
- Utility Knife
Prepare the Housing


- Remove the cover from your lamp cord outlet, the cover won't be needed.
- Measure the outlet and cut a matching opening in the bottom of your pill bottle with a utility knife, make it a snug friction fit.
- Locate a place for the switch near the cap end of the bottle where it will clear the outlet when in place. Measure the switch and cut a snug friction fit opening to accept it.
- Cut a hole in the center of the lids diameter to allow the lamp cord to pass through. The cord I used had a built in strain relief. If your cord doesn't, I advise wrapping some electrical tape around the cord where it will pass through the cap, to help protect the cord from being cut by the sharp edges of the hole.
Build the Circuit


Make sure that the lamp cord is NOT plugged into power before beginning!
- Pass the lamp cord through the hole in the cap, being sure the cap is facing correctly.
- Separate the two wires by pulling them apart about 6 inches from the end.
- Cut a 6 inch length off of one wire.
- Now cut this 6 inch wire into a 2 inch and a 4 inch length.
- Strip back the jacket on the long and short ends of the lamp cord about 3/4 inch.
- Strip both ends of the 2 inch and 4 inch wire the same.
- Pass the long wire end from the lamp cord through the neck of the pill bottle and out the outlet opening.
- Fasten the long wire end to one of the screw terminals on the outlet. Be sure to wrap the wire around the screw in the direction the screw tightens.
- Solder the diode between the two switch terminals.
- Solder the 2 inch wire to the switch terminal at the end of the diode opposite of the white line.
- Solder the 4 inch wire to the switch terminal at the end of the diode with the white line.
- Pass the switch through it's opening in the pill bottle, with the 2 inch wire going toward the neck and the 4 inch wire going toward the outlet opening.
- Bring the other end of the 4 inch wire through the outlet opening, then fasten it to the remaining screw terminal on the outlet.
- Push the outlet through the opening and secure it to the bottle.
- Push the switch into the opening and secure it to the bottle.
- If you have some heat shrink tubing, cut a 2 - 3 inch length and slip it on the short lamp cord wire past the stripped end.
- Solder the short lamp cord wire to the 2 inch wire end passing through the bottles neck.
- Slip the heat shrink tubing over the joint and heat it. Alternatively wrap it generously with electrical tape.
- Make sure that the switch terminals aren't shorting out on the outlet terminals.
- Screw the cap on tightly.