CNC Milling Stone


Cutting stone with a CNC machine is surprisingly simple with the right tools and a few tricks.
I've brought back a nice stone from my last hiking trip in Switzerland and christmas is getting closer and closer - so let's make a tealight holder...
Tools

Most stones are hard enough to dull and burn even the toughest carbide tools within seconds.
So we need some help of girls best friends: Diamonds...
I'm using 6mm diamond grinder bits with 3mm shaft.
- Don't worry, even though those are real (industrial) diamonds they are dirt cheap: I've spent 7.50 € (about $10) for a set of 30 grinder bits directly from China (eBay) and they proved to be really tough and reliable.
- Grinder bits come in different grit sizes: try to get a coarse one (e.g. 40 grit) - they work much faster and tolerate more abuse than finer versions (which in turn are nice if you want to achieve almost polished surfaces)
Things you need to know:
-
Never ever cut vertical: the fastest way to destroy a diamond grinder bit is to plunge vertically into the stone. You need to use a ramp of just a few degrees to work your way down into the material.
-
Use lots and lots of water: cutting hard stones creates large amounts of heat. Your grinder bit will glow red hot after just a few seconds if you try to cut without water. I prefer to submerge everything under water.
- Make good use of the diamonds: it makes little sense to use just the first few mm of a diamond coated tool. If your tool is covered at a length of e.g. 10mm use it by adjusting the step down value in your CAM to a value close to 10mm. Feed rates and tool life will be almost the same no matter which step down value you choose - so large values get much more work done before the tool is worn out.
CNC Program
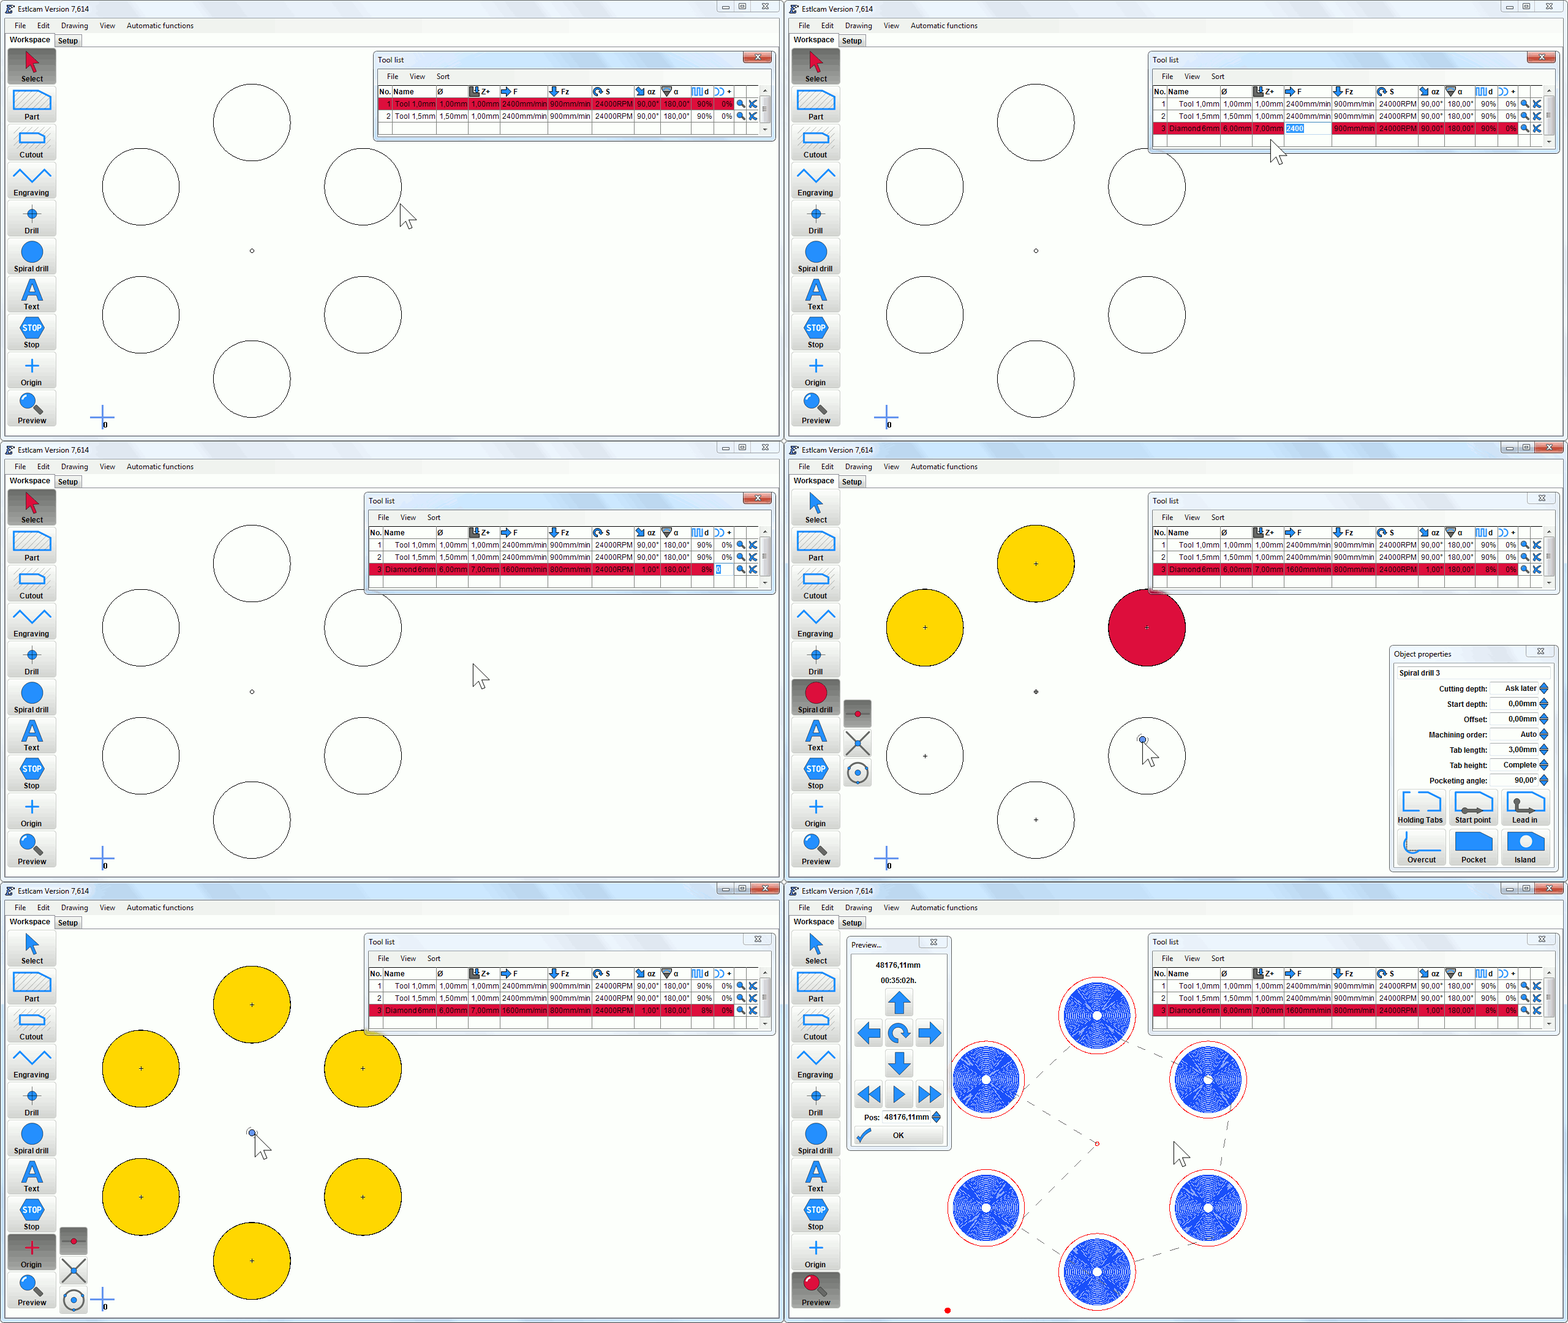
I'm using my CAM software Estlcam to create the CNC program:

(Click here for a larger picture)
First we need to create a new tool with appropriate parameters:
- Ø / Tool diameter: 6mm...
- Z+ / Step down: 7mm (.28")
My tool is coated with diamonds at a length of about 9mm (.35") and I'll be going to cut 21mm (.83") deep, so 7mm would be 3 passes and use most of the diamonds. - F / Feed rate: 1600mm/min (60 IPM)
I'll later only use Estlcams "spiral drill" function where the tool never cuts at its full width - and I'll also use very small step over rates - so this rather fast speed will be OK (but depends on the grit of your tool and also on the stone material).
If you use an operation that requires your tool to cut at its full width much lower feed rates in the range of 60 - 180mm/min would be required. - Fz / Z Axis Feed rate: 800mm/min (30 IPM)
Reduced speed for cutting downwards because this is much more difficult for the tool than cutting to the sides. - S / spindle speed: 24000rpm
Thats all my spindle can do - go as high as you can. - αz / Plunge angle: 1°
The most important setting: it makes sure the Z-axis will move downwards at a 1° slope instead of plunging in vertically. - d / step over: 8% (of tool diameter)
This very small step over allows to use the high feed rates above. It works faster this way than a large step over with slow feed rates.
Creating the toolpaths:
- Select the "Spiral drill function" and click at the center of each circle.
- Select the "Origin" function and click at the center of the drawing.
- Create the CNC Program with menu "File -> Save CNC program".
- When asked about the cutting depth enter 21mm.
(The actual pockets just require 16mm depth but the stone is not smooth so I set zero for the z-axis 5mm above the stone to prevent collisions)
Lets have a closer look how the pockets are made:
- It first starts with a small 1° (the ramp value) spiral downward, slowly cutting deeper and deeper until it reaches 7mm (the step down value).
- Then it starts with a big spiral to create the desired pocket diameter.
- Once this level is finished the cycle repeats...

Cutting


- I've put the stone into a plastic box and secured it with clamps.
- Make sure to put some soft material between stone and clamp and don't tighten up too much.
- Set your origin at the center (I've messed this up a bit as you can see).
- Stones are usually not perfectly smooth so we should set Z-axis origin above the material to prevent crashes.
I've definded 21mm deep pockets but only require 16mm, so Z-axis origin was set 5mm above the material. You'll see in the video that the cut starts well above the stone. - Finally submerge everything in water and start the CNC program.