Creating a Scaled Massing Model

WARNING - This instruction involves using a sharp blade. Use with caution. Adult supervision is recommended if under the age of 12. If using a strong type of glue such as Gorilla Glue, use with caution around the skin and eyes.
A massing model is a plain 3D representation of a surrounding building. They are often used in architectural models as a visual to re-create a site. They are typically undetailed and consistent in both material and color so the focus is on the proposed new building (which is likely detailed model).
If model making is a part of your career or just hobby, it is important to know how to scale the model for accuracy. This instruction will provide you with a basic understanding of how to create a simple massing model to scale. The result should be a clean looking box-shaped model.
Click on the attached link below to see a quick tutorial of the steps to come.
Downloads
Supplies
-
Pencil
-
Scrap paper
-
Basic calculator tool
-
X-acto knife
-
Cutting mat
-
Crescent board (also referred to as mat board)
-
Metal straight edge ruler
-
Paper clip or tooth pick
-
Glue (I use a clear all-purpose tacky glue priced at $2.99)
-
*All of these materials can be found in a craft store*
Decide the Scale and Do Some Math

Choose a scale that works best with your overall model. Determine the building's dimensions you are trying to model. Set up a cross multiplication problem to figure out the model's dimensions.
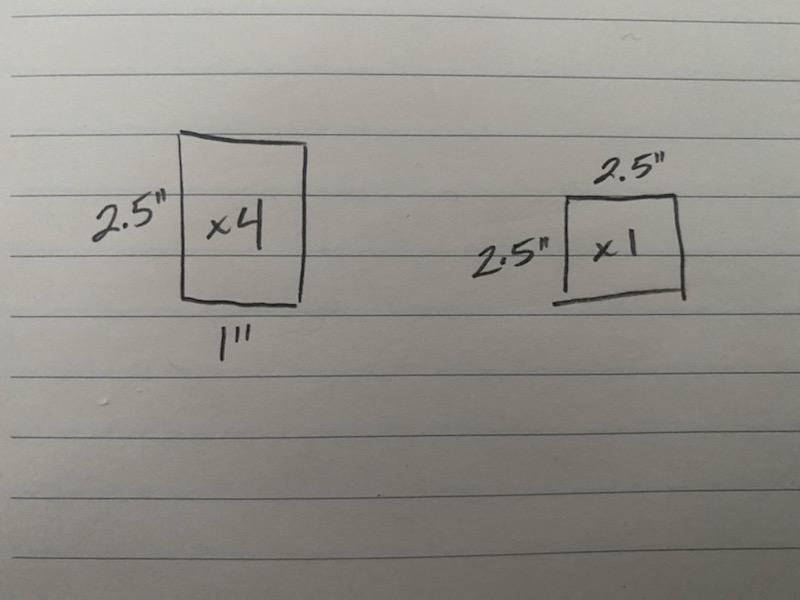
I created my model at a 1/32" = 1'-0" scale. This means every 1/32 of an inch on the model will represent 1 foot of realistic length. The building's length and width is 32 feet, and the height is 80 feet. Using fractions and basic math, the scaled model's length and width becomes 1 inch, and the height becomes 2.5 inches.
Example:
1/32" = 1'-0"
x = 80'-0"
1x = 80/32
x = 2.5"
Figure Out How Many Pieces You Need and Their Sizes

Determine the sizes of your pieces from the math and the quantity needed. A rectangular prism will need 4 side pieces and 1 top piece. Account for the material thickness if necessary.
Depending on crescent board thickness, you may need to account for the overlap. For example, my crescent is a little less than 1/16" thick. Therefore, two of the "side" pieces are 1/8" (1/16" + 1/16") less in width to make up for the thickness on either sides.
Trace Your Pieces

Cut the Pieces

Be sure you are cutting on a cut-friendly surface such as a cutting mat. Set up the metal ruler as a guide over your cut markings. Be sure the blade is not dull. Hold the ruler down with your non-dominant hand. With your steady dominant hand, carefully use the x-acto knife to slice the crescent along the ruler from start to end. Try to not cut at an angle. A metal ruler is recommended because they will not be damaged as easily as plastic or wooden rulers. Crescent will typically take two slices to make a clean cut. Tip: you shouldn't force yourself to cut through the crescent on the first slide. Simply score the material and then cut through the second time.
Glue Your Pieces Together

Take your paper clip and unbend it. Tip: put a dab of glue on a piece of scrap crescent if you have it. Use the end of the paper clip to slide bits of glue on the ends of your pieces. Glue two pieces at a time and hold them for around 30 seconds. Let sit to dry longer if possible before gluing the rest of the pieces. The tacky glue's drying time allows you to shift the pieces to be even more exact. This is not the case for glues that are quick drying such as super glue.
Let the Model Dry

Once the entire model is finished being glued together, let it sit until completely dried. Once done drying, you have finished your scaled model! Continue creating more models and arrange them according to your project needs.