Design a 3D Printable Tealight Holder With a Hidden Slot for a Spare Tealight
by vladimira.novotna in Workshop > 3D Printing
418 Views, 3 Favorites, 0 Comments
Design a 3D Printable Tealight Holder With a Hidden Slot for a Spare Tealight

Not only you'll be able to make your own tealight holder with this Instructable, but you'll also learn some basic stuff about Fusion 360.
Download Fusion 360 here: https://www.autodesk.com/products/fusion-360/overview
If you like Fusion 360 as much as I do, but need more help, go to Fusion's official help here: http://help.autodesk.com/view/fusion360/ENU/?guid=GUID-4E32611E-0790-479F-926A-66041C478864
Create Offset Plane

- Start a New Design.
- In the browser, make sure the light bulb next to the Origin folder is on so you can see the planes.
- In the Construct drop-down, click Offset Plane.
- Select the XZ plane and type in a value of 30mm.
- Hit Enter or click OK.
Create Sphere

- In the Create drop-down, select Sphere.
- Create Sphere of 80mm on the newly created plane.
- Hit Enter or click OK.
Split Body

- In the browser, make sure the light bulb next to the Origin folder is still on so you can see the planes.
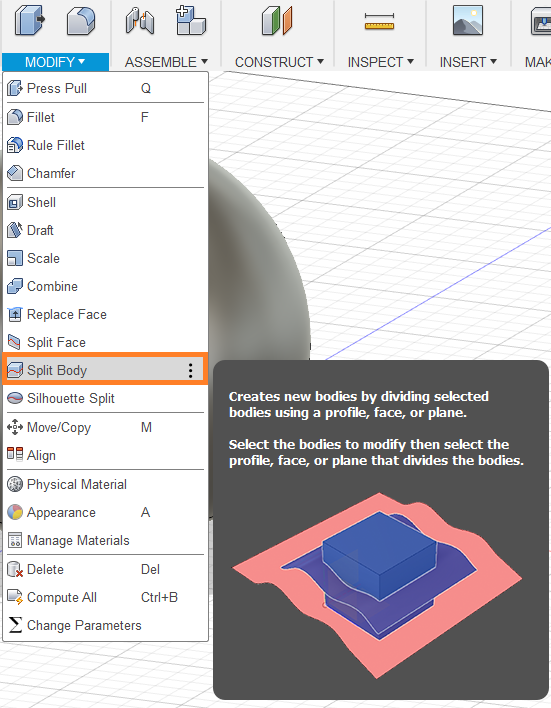
- In the Modify drop-down, select Split Body.
- Select the Sphere you just created as a Body to Split.
- Select the XZ plane as a Splitting Tool.
Note: If you’re experiencing difficulties to select the plane, click and hold the left mouse button on the plane to bring up the options where you can select the plane easily. Or expand the Origin folder within the browser and just select the plane from the browser.
5. Click OK.
Notice that you have two bodies in the bodies folder within the browser now.
Remove Body

- Identify the lower part of the sphere in the Bodies folder within the browser.
- Right-click the body and select Remove.
Create Offset Plane

- In the browser, make sure the light bulb next to the Origin folder is on so you can see the planes.
- In the Construct drop-down, click Offset Plane.
- Select the XZ plane and type in a value of 70mm.
- Hit Enter or click OK.
Sketch Circle

- In the Sketch drop-down, hover over Circle and select Center Diameter Circle. Or just hit the C key on your keyboard.
- Select the newly created plane and sketch a circle of 41mm.
- Click Stop Sketch.
Extrude the Circle

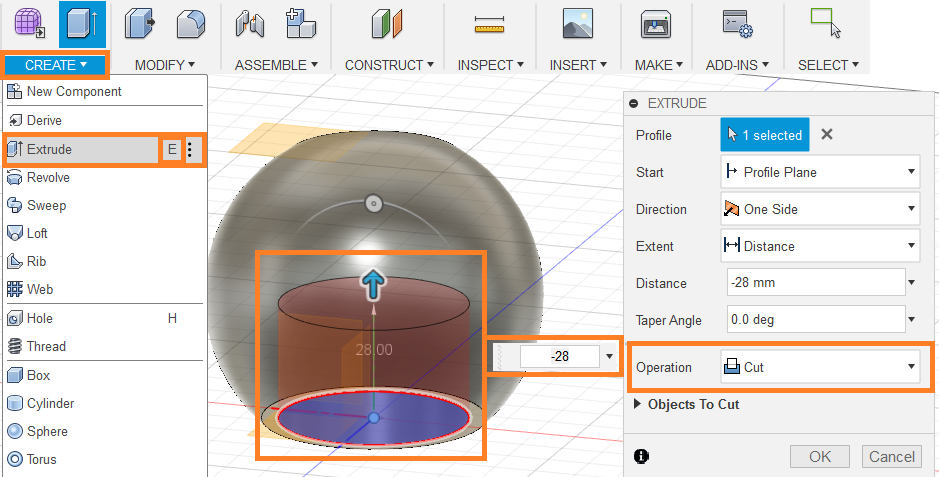
- In the Create drop-down, select Extrude. Or hit the E key on your keyboard.
- Extrude the circle to -23mm and make sure the Operation is set to Cut.
- Hit Enter or click OK.
Sketch Circle

- Use the View Cube to display the bottom of the tealight holder.
- In the Sketch drop-down, hover over Circle and select Center Diameter Circle. Or just hit the C key on your keyboard.
- Select the bottom face and sketch a circle of 45mm.
- Click Stop Sketch.
Extrude the Circle

- In the Create drop-down, select Extrude. Or hit the E key on your keyboard.
- Extrude the circle at the bottom face to -28mm and make sure the Operation is set to Cut.
- Hit Enter or click OK.
Sketch the Hidden Slot

- In the Sketch drop-down, hover over Circle and select Center Diameter Circle. Or just hit the C key on your keyboard.
- Select the XZ plane and sketch 3 circles with 1 common center point away from the tealight holder body. The diameters of the circles are: 54mm, 44.95mm and 41.50mm.
- Click Stop Sketch.
Extrude the Circles

- In the Create drop-down, select Extrude. Or hit the E key on your keyboard.
- Extrude the 54mm circle to 2mm and make sure the Operation is set to New Body.
- Hit Enter or click OK.
- Expand the Sketches folder within the browser and turn the light bulb next to the latest sketch on, so you can see the circles you sketched in step 10.
- Hit the E key on your keyboard.
- Extrude the 44.95mm circle to 23mm and make sure the Operation is set to Join.
- Hit Enter or click OK.
Create Chamfer

- In the Modify drop-down, select Chamfer.
- Select the upper outer edge.
- Type in a value of 1.7mm.
- Hit Enter or click OK.
3D Print It and Insert Tealights

Enjoy! :)
