How to Draw Stylized Faces

If you have ever wanted to learn how to draw a face but you didn’t know where to start, then these instructions will hopefully lead you in the right direction. As a beginning artist, despite wanting to draw faces, you may have trouble knowing where certain features should go and why they belong there. In these instructions, I will give you the basics of drawing faces, both stylized and realistic (depending on what you prefer), as well as a few tips and tricks that helped me when I was a beginner as well. Along the way, I will be showing you examples of different features. Feel free to use the examples I have included as a reference for your own drawings. Let’s begin!
Supplies
A sheet of paper. Any kind of paper is suitable, but a blank, white sheet is preferable for beginners.
A pencil. The kind of pencil is a matter of personal preference. You may use art pencils, such as these, but I simply like to use a mechanical pencil!
An eraser. Again, you may use an eraser like this one, but I use the eraser on my mechanical pencil.
A reference image. I will talk more about these below, but here is my Pinterest board of reference images I have compiled.
Find a Reference

If you find drawing a face to be intimidating, a good idea is to find a reference image. A reference image is a picture that you, as an artist, can closely analyze and try to imitate on the page. This step is especially helpful for people who are just starting out, and who have trouble knowing where features should go and what each shape should look like. As a beginner, you should try to find a picture of a person who is facing the camera, preferably with little or no facial expression. When you begin to progress, then you can move on to more advanced expressions and angles.
I like to keep a board on Pinterest filled with images of interesting faces. This may be useful for you as well! Whenever you would like to practice your drawing skills, you can go into this board and pick out a different face. Each time you draw a unique feature, you add to your knowledge. If you would like to use my board of faces, I have linked it above under Supplies & Resources. For this tutorial, I will be using the above image. If you are following along, you may use the same image or pick a different one that you like better.
Sketch Out the Face Shape

So, where exactly should an artist begin when drawing the face? The answer is that there isn’t one solid answer. Different artists start drawing the face in different places. However, I find it easiest for beginners to start by making a quick, light sketch of the face shape. Faces come in a bunch of unique shapes and sizes. These shapes include oval, heart, square, round, diamond, and oblong.
Typically, you can tell by the shape of the jaw, chin, and forehead, and their sizes in relation to one another. For example, Beyoncé has an oval-shaped face because her cheekbones are wider than the widths of her forehead and jaw, creating an oval shape. Angelina Jolie has a square-shaped face because her jaw is strong and sharp, and it is the same width as her cheekbones and forehead, creating a square shape. And the reference image I have chosen for these instructions has a heart-shaped face, as her forehead is wider than her jaw, and her chin comes to a point, creating a heart shape.
Your light sketch of the face shape does not have to be perfect. We will be fixing it up later. For now, we just need a general shape where we can put in her facial features. Remember to closely look at your reference image. What shape is her chin? Is it rounded? Pointed? Is there a cleft? How does the chin connect to the jawline? How far up from this jawline are her cheekbones? These are questions to take into consideration during your sketch. Worry less about perfection and more about how your lines interact with each other.
Eyes


After you’ve quickly drawn the general shape of the face, we can now move on to the features. I like to start with the eyes! Eyes, just like faces, come in different shapes. The most common shapes are almond, hooded, downturned, upturned, and monolidded. I've included some examples.
Almond eyes look like almonds, hence the name. The inner corner of the eye is in line with the outer corner. Hooded eyes look a bit like almond eyes, but the skin above their eyes and beneath their eyebrows cover portions of the eyelids. Monolidded eyes, most often appearing on East Asian people, can be identified by a lack of crease.
Figure 1: My reference has large, upturned eyes. If you notice, the outer corner of her eye ends higher on her face than the inner corner, which is what makes them upturned. Downturned eyes follow the opposite rules. If it helps, you may draw little points on the face where you would like the eye to start and finish.
If you are interested in stylizing the face, this would be the time to think about what you would like to stylize. Because the model I’ve chosen has such big eyes, I will be drawing this feature bigger than her other features, almost to a cartoony standard. Doing things like this can help you to develop an interesting style, and it can create a unique, striking image. Try to pick out the most noticeable feature on their face, and exaggerate it.
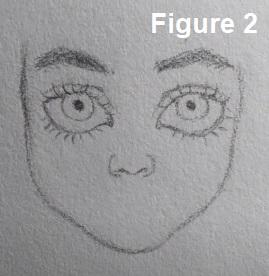
Figure 2: After you’ve drawn in your points where you’d like to place the corners of the eyes on the sketch of the face shape you created, it is time to draw the eyes! For this tutorial, we will begin with the top of the eye. Start drawing the top lid of the eye by drawing a slightly curved line from the inner corner to the outer corner. Don’t worry if it doesn’t look exactly like the image you chose! Remember, it is simply a reference to get the general idea. Don’t be discouraged.
Figure 3: From the outer edge of the lid you just drew, create the lower lid and form a sort of teardrop shape. Keep referring back to your reference if you need help with what the shape should look like.
Figure 4: When the shape of the eye is finished, add the iris (the colored part of the eye) and pupil (the dark inner circle) by making two circles. You can play around with the placement of these circles within the eye, but be sure that the pupil is always in the center of the iris. Darken the pupil with your pencil.
Figure 5: Add in the crease of the eyelid (if there is one). This will typically follow the general shape of the top line we created earlier.
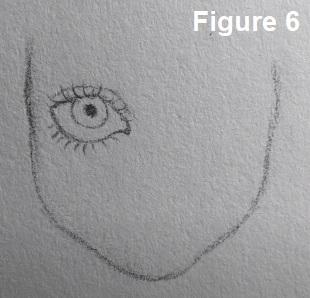
Figure 6: Now, you can add eyelashes, which curve out away from the lids. I find it helps to find the middle of the eyelid and draw one straight eyelash, and as the lashes go farther away from this midpoint, you draw the lashes more and more curved. Make your lashes as exaggerated or as toned down as you like. I usually prefer the exaggerated look!
Figures 7-8: Now, onto the eyebrows. Eyebrows have the ability to change the entire look of a person’s face. They may be arched, straight, curved, thin, thick, etc. My model’s eyebrows start right above the inner corners of her eyes, and slant upwards towards the middle to create an almost triangular shape. Lightly use your pencil to map out the shape of the eyebrow. Once you’ve done this, add in little hairs to show the movement of the brows. If you haven’t already, repeat this entire step on the other side of the face. The general rule is that the width of one eye should fit between both of the eyes. Of course, this rule can be broken, but this may be helpful for you as a beginner. At this point, you should now have two eyes and two eyebrows.
Nose


Next, I like to draw the nose. Noses can be wide, thin, hooked, upturned, etc. I've included some examples of how different noses can look.
Figure 1: The reference image I chose has a small nose with a wider and less defined bridge. Look very closely at the details and try to follow the shapes of the nose as best as you can. Personally, I believe it to be best to begin with the nostrils, as the rest of the nose can be built around them. If it makes placement easier, you can look at the curves of the jawline on your reference, and use this to decide how low on the face to place the nostrils. Remember to look at your reference and follow the shapes you see. Nostrils usually look like two subtle upside down U shapes that connect in the center.
Figure 2: Now, add the outer edges of the nose. These will look like sideways U shapes. The bottom of these lines should curve under the nostril lines you just drew.
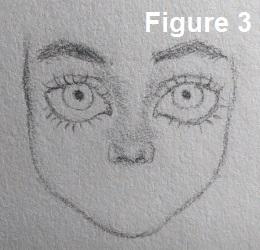
Figure 3: This is optional, but I really like to add shading here. If you would like to do this as well, you should examine where the shadows and highlights hit, and where they sit on the face in relation to one another. Using your pencil very lightly with the side of the lead that is less pointy, begin to block out where you see the most shadows on your reference’s nose. The darkest shadows will usually show around the bridge of the nose and under the nostrils.
Mouth


After you’ve finished the nose, it is time to add the mouth. Mouths can be short or long, and the lips can be plump or thin. I've included some examples of different mouths.
Let’s look back at the nose we just drew. How far down from the nose is the mouth sitting on the face? How far out do the edges of the mouth go from the edges of the nose? Again, if it helps you, you can place dots on the face where you believe these edges should be. The girl in my reference image has plump lips that go out a little bit farther than the outer edges of her nose.
Figure 1: Begin by drawing a curved line in the middle of the two outer points of the lips. This may look like a slight W shape.
Figure 2: Add the top lip by drawing lines up from the points of the mouth and having them meet, making sure to include the shape of the philtrum, which is where the lip dips in under the nose.
Figure 3: After that, draw in the line of the bottom lip, which is usually a wide U shape, making sure to compare the thickness to your reference image.
Clean Up the Sketch of the Face

For this step, look back at your reference image to check where these lines should be drawn in relation to the features of the face. My reference has a small chin that comes to a slight rounded point underneath her mouth. Her jawline curves outward before going straight up next to her eyes. This will be different for each person, so remember to refer back to your selected model.
Adding Details


Details can vary widely for different faces. It all depends on your personal preferences. If you’d like, you may add to or leave out certain details. Using the same technique we discussed in step 3, lightly add shading to the areas of the face that appear the darkest. This will make your face look more 3D! Some good places to add these shadows are under the cheekbones, around the edges of the forehead, on the lips, under the eyes, and anywhere else that your reference has noticeable shadows. You may also add freckles or moles.
My reference has plump cheeks, but I can see a slight line where her cheekbones should go. She also has a bit of freckles across her cheeks and nose, so I’ve added those. Once you practice adding these shadows and details more and more over time, it becomes easier to decide where to place these things on the faces of your own characters. It’s similar to the stylization of a character. It starts to become intuition.
And now you’re done! Once you’ve gotten the face down, you can move on to more difficult things like hair, clothes, and much more. All you have to do is practice with a bunch of your own reference pictures, and soon you will have bettered your skills enough to create characters on your own. It may be hard at first, but do not be discouraged. Being an artist is not all about talent. It is about diligent practice and endless determination. Keep going and you will always be successful!