How to Fix a KitchenAid Mixer That Isn't Spinning
by toolrepair in Workshop > Tools
229744 Views, 43 Favorites, 0 Comments
How to Fix a KitchenAid Mixer That Isn't Spinning

If your KitchenAid stand mixer has stopped spinning, chances are that it doesn't have to mean the end of your mixer's service life.
To add to the good news, many KitchenAid mixer repairs can also be done right at home with simple tools, saving you money at the repair shop.
KitchenAid stand mixers are designed to survive a number of normal breakdowns and parts replacements. Some parts, like one of the gears that spins the mixer, are even designed to wear over time and/or fail under stress.
This articles explains how to replace the worm gear in a KitchenAid mixer, the part that most commonly causes a mixer to stop spinning in many stand mixer models.
Anyone can take household repair matters into their own hands with this professional repair information and eReplacementParts.com's online inventory of O.E.M. KitchenAid parts.
KitchenAid Mixer Worm Gears

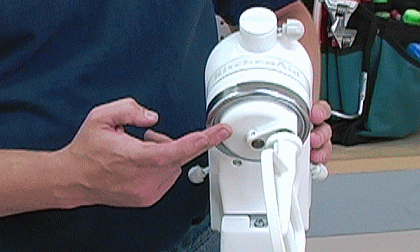
The mixer's gearbox is positioned just above the planetary in the front end of the motor housing. Several gears inside the gearbox work together to spin the planetary.
For this style of KitchenAid mixer, one of the gears is specifically designed to fail before the others--a gear called the worm gear.
KitchenAid mixer worm gears are made to absorb stress and friction during operation. They can either wear slowly over time so that metal gears do not wear, or they can completely fail when the mixer is overloaded, as a safety mechanism.
In this mixer style, the worm gear is made of a hard nylon material that is less hard than the other metal gears in the gearbox. This difference in hardness ensures that the worm gear breaks before the metal gears tear each other to pieces.
Because KitchenAid mixers are made to last many years (even decades) you should expect to replace the worm gear in this style of mixer sometime during its service life.
Replacing the KitchenAid Mixer Worm Gear

In fact, the biggest challenge might be managing the greasy situation waiting in the gearbox, so make sure that you have some shop towels handy.
Other than that, disassembly and reassembly of the mixer is easily handled with a couple of screwdrivers, a pin punch, pliers, and a hammer.
There are a few tricks that make parts of the repair easier, so make sure to read each step.
1. Remove the drip ring.
The planetary drip ring decorates the mixer and contributes to the seal around the planetary. It has to come off in order to pry the planetary off of the mixer.
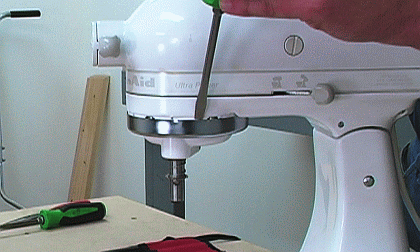
Carefully place a flat head screwdriver against the upper lip of the planetary drip ring, then lightly strike the screwdriver with a hammer.
The drip ring is only held on with a little bit of tension, so a light tap should make it fall right off the mixer.
2. Remove the planetary shaft roll pin.
A roll pin holds the planetary to a shaft coming from the gearbox. Trying to pry the planetary from the mixer won't do any good with the roll pin still in place, so it must be removed.
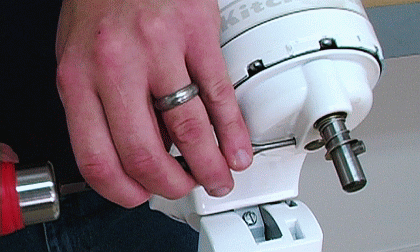
Using an appropriately-sized pin punch and a hammer, lightly tap the the roll pin out of place.
3. Pry the planetary from the mixer.
With the roll pin and drip ring removed, the planetary is ready to be freed from the mixer, however, it is still held snugly in position by the tight fit of its internal gears.
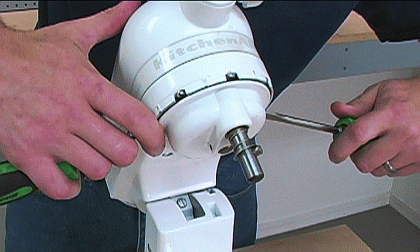
The best way to remove the planetary is by using a couple of flat head screwdrivers as pry bars.
Position the two screwdrivers in the indentations on the sides of the planetary and carefully pry the planetary off.
4. Remove the five motor housing screws in the front.
Now that the planetary is off the machine, the next order of business is to remove the motor from the mixer.
The motor is located in the top half of the two major sections of the mixer. To lift the motor off the mixer, all fasteners connecting the bottom and top halves of the mixer must first be removed.
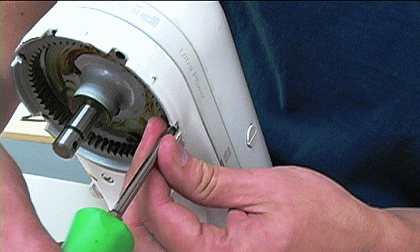
The first set of motor housing screws to remove are located in the ring underneath the planetary. Remove the five front motor housing screws with a flat head screwdriver.
5. Remove the four motor housing screws in the back.
There are four more motor housing screws in the back of the mixer that must be removed with a flat head screwdriver.
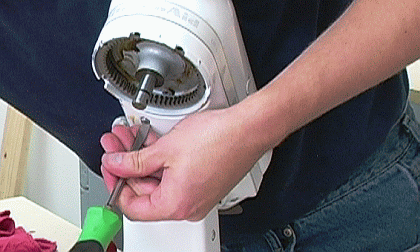
Attention! One of the rear two motor housing screws will have a lock washer on it. This lock washer screw is a fail-safe in case the other screws shake loose. Take note of the screw when you disassemble, because it must be returned to a rear position in the mixer.
6. Remove the rear housing cover.
The rear housing cover of the mixer helps to hold the two halves of the mixer together.
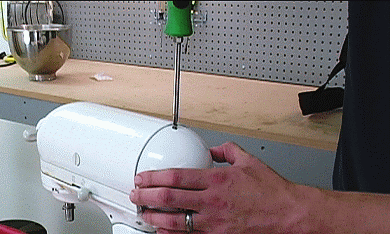
Only one Phillips head screw holds the rear housing cover to the mixer.
7. Pull the power cord strain relief out.
The power cord strain relief simply pulls out of the rear of the mixer.
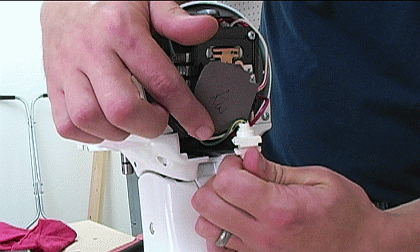
8. Lift the motor housing off of the mixer.
With the housing screws removed, the rear cover off, and the strain relief disengaged, the motor is now free from the lower half of the mixer.
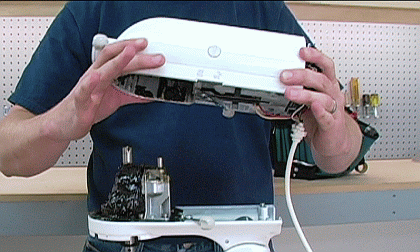
The front end of the motor housing is actually part of the mixer's gearbox that attaches onto a gear shaft, so it will still be partially secured onto the mixer.
Lift the motor housing straight up to pull it off the gear shaft and away from the mixer.
Set the motor housing aside. You'll need to transfer grease to the gearbox portion of the motor housing in the next step.
9. Remove all excess grease from the mixer gears.
You will discover a large amount of grease on the mixer gears--this is normal.
However, excess grease on the gears must be temporarily removed in order to access the gear tower assembly and remove the worm gear.
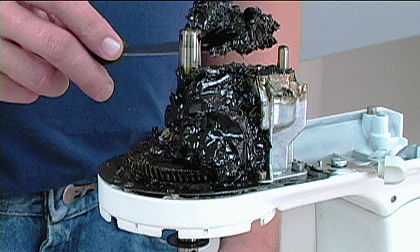
Use a putty knife to scoop the grease off of the gears. Place the grease in the upper portion of the gearbox located on the top half of the mixer.
The grease must be returned to the gears after the worm gear replacement is complete and before returning the motor housing to the mixer stand.
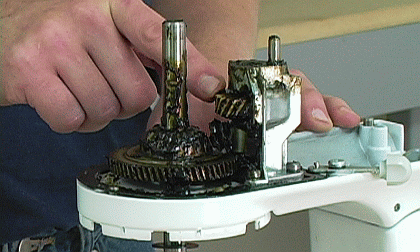
After removing enough grease, the worm gear will be visible in the gear tower assembly. Inspect the gear for wear and damage to verify that it is the cause of the mixer malfunction.
10. Disengage the gear tower assembly.
The easiest way to access the worm gear is to remove the entire assembly
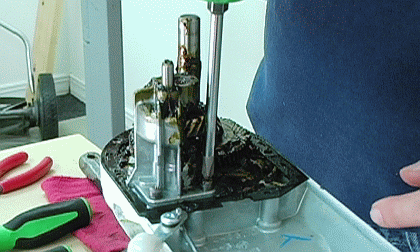
The gear tower assembly is only held into place with two or three Phillips head screws. Unscrew the tower assembly screws and lift it from the mixer.
11. Remove the gear tower roll pin.
A roll pin holds the gear tower gears to each other.
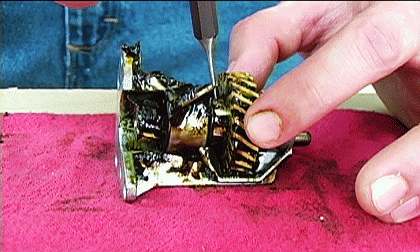
Again using a hammer and a pin punch, gently strike the gear tower roll pin until it comes out of the tower assembly. You may need pull it with a pair of needle nose pliers the last little bit.
12. Pull the tower gear out of the assembly.
The tower gear pulls right out of the bottom end of the assembly after the roll pin is removed.
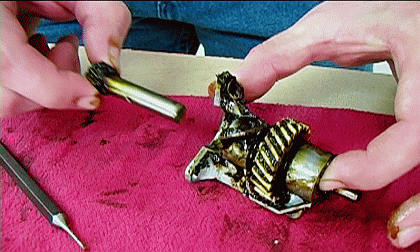
13. Remove the old worm gear.
The old worm gear is finally ready to come out of the tower assembly, and it will simply pull out.
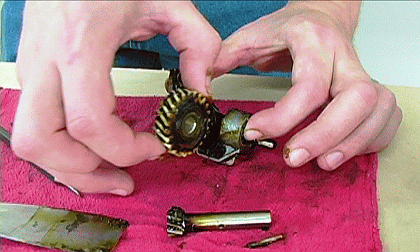
There is a washer spacer on each side of the old worm gear that must be transferred to the new worm gear.
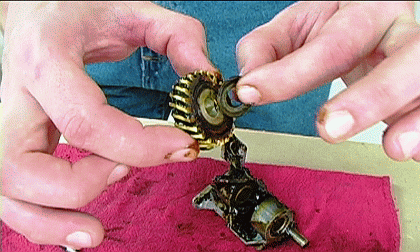
Make sure to save the two washers and set them aside for reassembly.
14. Install the new worm gear.
Place the two washer spacers you saved on the new worm gear, one on each side.
With the washers on, install the new worm gear into position in the gear tower assembly.
This completes the installation of the new worm gear into the KitchenAid mixer. Finishing the repair is just a matter of reassembly.
Reassembly of the KitchenAid Stand Mixer

After installing the new worm gear, the rest of the gear tower assembly must be reassembled as well.
Reinsert the tower gear into the bottom of the assembly and turn the gear by hand until the roll pin hole lines up with the hole on the tower gear shaft.

Once the roll pin hole is aligned, reinsert the roll pin by hand and tap it in the rest of the way with a hammer. When installed correctly, a small length of the roll pin should protrude out each side of the pin hole.
2. Return the gear tower assembly to the mixer.
The gear assembly can go back on the mixer after it is reassembled.
Carefully position the assembly on its alignment pins on the mixer and return the screws that affix it.
3. Replace the motor housing.
A bearing in the gearbox must be lined up on the gear spindle when you put the motor housing back into position.
Use your spatula to pile the gearbox grease back onto the gears before replacing the motor housing. This is the best way to ensure that the grease returns to the correct position.
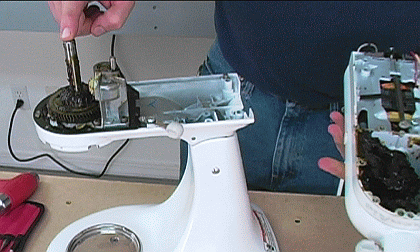
4. Align the motor housing gears.
The motor housing will not completely return to its correct position without a little alignment--this is normal.
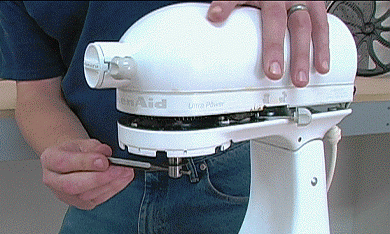
Insert a pin punch into the hole in the gear shaft. Turn the gear shaft with the pin punch while gently applying pressure on the top of the motor housing.
You do not need to press hard to do this correctly.

Once the gears line up, the motor housing will seat into position.
5. Return all the housing fasteners.
First return the five screws that go under the planetary. As the screws tighten, the two halves of the mixer will pull together and make a tight seal.
Follow up by returning the four housing screws in the back of the mixer.

Remember that the lock washer screw must be returned to one of the rear positions in the mixer.
6. Replace the rear housing cover.
The rear housing cover of the mixer simply reinstalls by replacing it on the mixer and returning its one screw.
7. Press the planetary in place by hand.
The planetary will press right back into position by hand.
Keep in mind that some of the gears must line up for the planetary to seat, so you may need to give the planetary attachment shaft a turn to get the gears to mesh.
8. Replace the planetary roll pin.
Pressing the planetary back on the mixer by hand will not completely align the roll pin hole on the planetary with the hole on the gear shaft.
Insert a small screwdriver into the roll pin hole to align it.
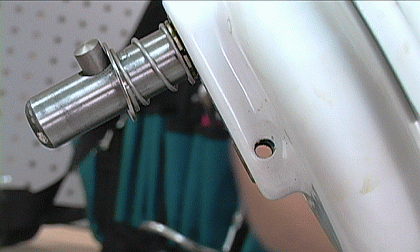
The roll pin can be tapped back into place with a hammer once the roll pin holes are lined up.
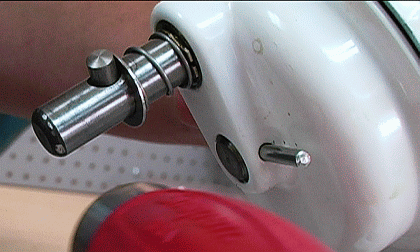
9. Press the drip ring into position.
Last but not least, the drip ring. With the planetary secured back into position and the rest of the mixer reassembled, the planetary drip ring can be pressed back into place by hand.
This completes the full reassembly of the KitchenAid mixer.
Disassembling the mixer, replacing the worm gear, and reassembling the mixer can take about thirty minutes to an hour, but the time spent performing this repair at home is well worth avoiding the only alternative, a costly shop bill.
Conclusion

- all mixers containing "KSM" in their model numbers (except the KSMC50).
- all mixers whose model numbers begin with "K5," or "K45."
To order a new worm gear for your mixer, visit this KitchenAid Mixer Parts page where you can browse or search by model number.
You will be directed to your mixer's parts page where a schematic diagram for your mixer will be displayed. The breakdown diagram is a useful tool for accurate parts ordering and repair help.
This small appliance parts shipping service and information tools resource from eReplacementParts.com make it possible for people everywhere to save money by performing their own household repairs.