How to Make Crimp End Caps for Pendants | Electroforming
by CuForming in Craft > Jewelry
1037 Views, 4 Favorites, 0 Comments
How to Make Crimp End Caps for Pendants | Electroforming


The most common piece of jewelry is worn around the neck. Pendants and necklaces come out in an infinity of variety with a chain, a solid wire or a cordage. When using cords specifically, it's necessary to set a finding that allow to link the two extremities behind your neck. There are lots of options on the market, hooks, clasps, loops, caps, and ending of any kind but all machine made.
I wanted to make something organic that resemble the handmade style of my creations.
With an electrical wire terminal that it's crimpable and a bit of copper wire, I made by hands what I had in mind.
These are my handmade crimp ends or crimp end caps.
Supplies

- Electrical wire terminals https://ebay.to/3y9ZWEE | https://amzn.to/3SVL2dq
- Electrician scissors https://amzn.to/3zZSjBE | https://ebay.to/3DXUvLs
- Copper Wire 0.6 mm: https://amzn.to/3LwdFtM | https://ebay.to/3Iifrxj
- Wrap n tap pliers https://amzn.to/3DxT9YM | https://ebay.to/3N4yMFJ
- Flat Nose Pliers: https://amzn.to/3IZ88ea | https://ebay.to/36yXkVZ
- Solder iron: https://amzn.to/3hoRRGL | https://ebay.to/3tfzM0q
- Solder flux: https://amzn.to/3DJfwt2 | https://ebay.to/3Eiq04g
- Lead free Tin solder: https://amzn.to/3fMONno | https://ebay.to/3Tm1iEn
- Third hand clamps: https://amzn.to/3EdPT56 | https://ebay.to/3TfldVr
- Acetone: https://amzn.to/3fJeDc9 | https://ebay.to/3UGNC7W
- Copper tape: https://amzn.to/3G08HpO | https://ebay.to/3UJTAoB
- All the electroforming supplies https://kit.co/cuforming/electroforming-advanced-kit
- Liver of Sulfur https://ebay.to/3BOoR1i | https://amzn.to/3Gt7p34
- Zapon Lack: https://ebay.to/35BMb6z
- Round Nose Pliers: https://amzn.to/3DwI9ZO | http://ebay.to/3IVSPm5
- Lobster clasp : https://amzn.to/3IukJ96 | https://ebay.to/3JZaiuJ

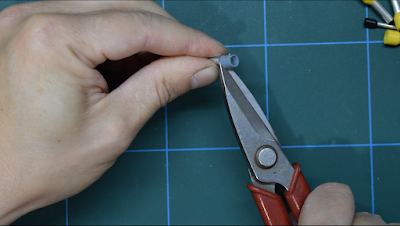
Starting by removing the plastic sleeve from the terminal and keep the metal part that is gonna be the main body of our caps.
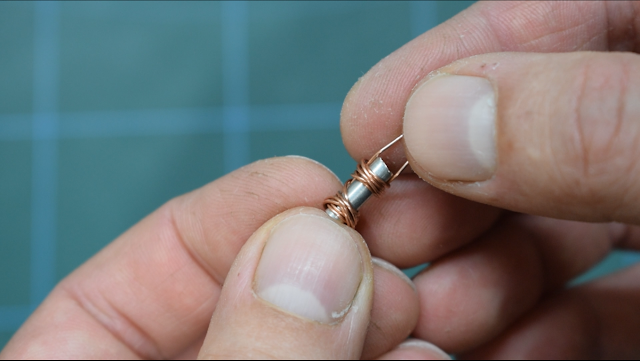
With my wrap 'n tap pliers, I made a loop on a piece of copper wire that I set on top of the metal cylinder. I wrapped the wire around the body to secure the initial extremity, with a first coil on top, and then I made a second coil on the bottom. After that, I cut the excess wire and I bent the final extremity to keep it from sticking out.
With the same technique, I made a similar one with just one coil.
A third way to make a crimp end is to just make a loop with no coils.

After I prepared a bunch of pieces, I then set them up on my third hand to solder them with a common solder iron for electronics.
When I solder wires, I normally use flux. It makes the job easy and I can be sure that the solder tin goes inside all the crevices of the wire, making the join sturdy and firm. The downside of flux is that it's messy, and it's gonna isolate the surface of the metal. It's a greasy stuff and electroforming is not gonna work on it.
After I spent a few hours soldering every piece, I dip them in acetone. Sadly, it doesn't dissolve all the flux, but it does help to soften it. I then put them in a small pot with boiling water and left them for a few minutes. Seeing all the grease floating up on the surface of the water made me be sure that my pieces were perfectly clean and conductive, ready for the next step.
I also made a non soldering option with copper tape. I cut small strips of tape and wrap them around the tube to secure the copper wire loop. One on the top and one on the bottom to leave the middle part clear for crimping.
I then prepared a copper wire with a bunch of waves to hang all those little pieces inside the tank.


Once I took them out of the bath I rinse them in water and dip them long enough, in a solution of liver of sulfur, to give them an antique look patina. Rinse again and let them dry.
Liver of sulfur is the chemical substance used to color copper and silver. It has an intense smell produced by the evaporation of the sulfides, just like rotten eggs. It's recommended to use a respirator mask or work in a ventilated area.
After we are done with our job, we need to neutralize it with baking soda or better with bleach or leave it to evaporate before flushing in the drain. It's a toxic substance, we don't want to contribute to pollution.
The patina might change look with time, so I'm gonna protect them with Zapon lack. This is the boring part of this job. I have to dip them in zapon and centrifuge them one by one, or they will stick together in the process. Then I let them cure for 2 days.

Crimp ends are finished, and now they need to be mounted on cords. To do this, we need pliers of the right width. Any kind will do the job as long as they don't have teeth.
Insert the cord in to the hole and press the tube. Double coil crimps can be crimped in the middle. Single coil, on the bottom, and the no coil ones can be crimped on their entire body to become flat. Also, the ones with copper tape can be crimped in the middle, but they are not as cool as the wire ones.
They always go in pairs and, to complete the necklace, we can add a clasp or a hook for the closure.

I hope you liked this project and got inspired to make some of this small things.
Also watch the related YouTube video and subscribe my channel for more tutorial like this one
If you like them, but you are too tired to make them, you can find them on my Etsy shop:
https://www.etsy.com/listing/1327980293/2pcs-copper-crimp-ends-for-pendant
Thank you all by CuForming.


