MyGarage DIY

You're in bed at 11:30 PM, watching TV. Then you come to the sudden realization that you might have left the garage open ? What do you do ? Struggle out of bed all the way to the garage to find out it was actually closed (or open). Only if there was a way to know if your garage was open without going through the struggle.
This application was made in as an attempt to cheaply & easily automate one's garage. I think i was a little successful with this as all the parts could be bought for about $20. I'd advice splurging a little more and getting higher quality parts though. The main idea here is we have a server hooked up to a relay and some ultrasonic sensors. These sensors read and interact with the Raspberry Pi to provide information that can be accessed via the server.
Parts!
Parts
- Raspberry Pi Zero
- 2 Ultrasonic Sensors
- Wifi Dongle*
- SD card (4 or 8gb)
- Simple relay
- Optional: miniHDMI Adapter**
- Optional: USB Hub**
- Optional: >1A microUSB Hub**
- Optional: microUSB -> USB adapter**
- Optional: Headers**
- Alternate to Ultrasonic sensors : Wired Door magnets
*I Personally used this but it seems to interfere with my actual garage opener so i recommended a different one
**You can avoid all the optionals (except the power supply) above by getting a Raspberry Pi 3 (or one with decent ports)
Parts (Cheap Version)
You'll need a monitor to get things going with the pi.
Backend - 1
Backend
Take a minute to familiarize yourself with the layout of your pi. Gather soldering tools, wires, jumper cables, and all other stuff. This will be a handy reference tool for pin layout.
General Overview
The general overview is we have 1 ultrasonic sensor to measure the distance to the car, 1 to measure the distance to the top of the garage, and a relay to open the garage. We measure the distance to the top of the garage because it's more accurate when the distance is not too far away. Pointing the sensor straight towards the garage door will introduce extra errors and inaccuracies. The relay shorts the 2 wires that triggers the garage door. These 2 wires are nearly universal and you should have no problem with this. You could either short the 2 wires coming from the wall switch, or (like i did) connect your own wires to the 'ports' as seen below.
Quick Recap. Position Ultrasonic sensors to face the top edge of the door and the car (assumes a single car garage) and the relay is to be wired into the garage box. Info on relays here
Raspberry Pi Setup
This is not meant to serve as a setup tutorial (i'll go over the basics) but here are much more detailed tutorials on getting started. I advise you even run some menial programs on your own. Here's a wonderful instructable on this and here's the official setup page
QUICK OVERVIEW - Install Raspbian unto the SD card - Go to the downloads page and download the Raspbian Jessie image - Follow the instructions to write the image unto an SD card for Windows, Mac or Linux - Play around with all that comes with Raspberry ? - Go through initial setup. - Luckily, most peripherals are plug and play. You might have to change a password here or there but there isn't much setup to do other than writing the image. - Install Flask - This shall be our Server aplication/library - Make sure the internet is working
<code class="sh">pi@raspberrypi ~ $ sudo apt-get install python-pip
pi@raspberrypi ~ $ sudo pip install flask
- Connect all the components up
- There should be 3 components to wire up. The 2 ultrasonic sensors (one for the car and one for the garage)
- Here's the code (self explanatory) I personally used to setup my sensors. You may change it anytime. Remember to reference this chart for pin numbers.
<code class="python">        trigDoorPin=24    #Trigger pin for ultrasonic targeting the door. Using BCM Mode on RaspPi
        echoDoorPin=23
        trigCarPin=12
        echoCarPin=26
        GPIO.setmode(GPIO.BCM)      #Needed config. Google 'BCM'
        GPIO.setup(4,GPIO.OUT)      #Setting up IO pins
        GPIO.setup(15,GPIO.IN,pull_up_down=GPIO.PUD_UP)
        GPIO.output(4,GPIO.LOW)
        GPIO.setup(trigDoorPin,GPIO.OUT)    #Set pin as GPIO out
        GPIO.setup(echoDoorPin,GPIO.IN)     #Set pin as GPIO in
        GPIO.setup(trigCarPin,GPIO.OUT)
        GPIO.setup(echoCarPin,GPIO.IN)
- Don't forget the relay. - i did not define the relay. Rather, since the function for this was simple, i did it inline.
<code class="python">def openClose(): #Basically, turn on the relay for half a second (.01 seconds didn't work).
    GPIO.output(4,GPIO.HIGH)
    sleep(.5)
    GPIO.output(4,GPIO.LOW)
- Test and make adjustments
- The 2 parts of the backend code you'll need to adjust are the thresholds (line 32) AND the passphrase.
- Each threshold is unique. You'll have to experiment to see where yours lies.
- The passphrase is a security feature to ensure anyone who knows you have open ports in your network can't guess their way into it. A blank passphrase is treated as "". I advise you use this feature even if the passphrase is as short as "a".
- The passphrase is then converted to md5(). so localhost:6011/togglea is not going to work. Rather localhost:6011/toggle0cc175b9c0f1b6a831c399e269772661
- Final code comments
- The rest of the code is pretty straight forward and heavily commented. You should take a look at it.
EDIT: Someone asked about wiring up the Ultrasonics. Here's my reply
If your Ultrasound has 4 pins, 1 of them should be ground. The other Power or VCC. as you can see here. https://electrosome.com/wp-content/uploads/2014/08...
Raspberry's have GND and VCC pins, so you'd want to connect them to each other. Then we have the Echo and trigger pins, those can be connected to any GPIO pins you want. Refer to this diagram (or the one specific to your model) https://www.element14.com/community/servlet/JiveSe...
Make a note of the GPIO port, so that'll be 20 for GPIO20 NOT pin 38. 20. Since we're using BCM mode.
In the python script, be sure to change the trig and echo pins to be the same as the ones you wired it up to.
If your Ultra has 3 pins (parallax ultra's do) just set the trig and echo pin in the python script to be the same.
Backend - 2
Mounting options
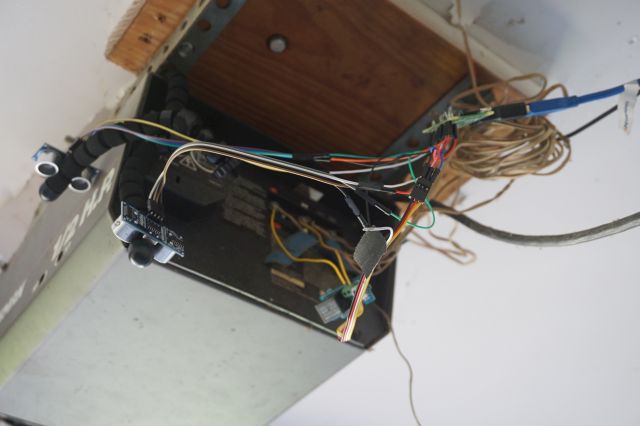
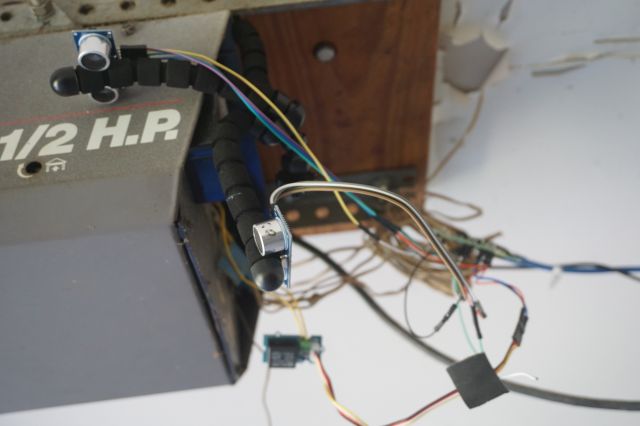
Wrapping Up
If all went well, you should be able to go to theraspberrypisIPaddress:6011/toggle + whatever the md5ofthepassphrase_is and your garage should open.
This is the ideal case scenario. If all didn't go well, troubleshoot by running individual functions e.g. the openClose() function to determing if the relay works as expected. I'll also advice you have all this setup BEFORE you hook it up to the garage.
The WWW
So how would you make it possible to be able to open your garage while not connected to you homes network? This is Called Port Forwarding. A feature most routers should have.
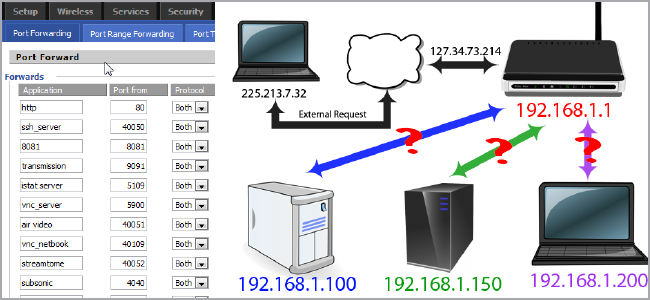
Google your router's manufacturer + port fowarding. Each one is different. I have Netgear and i need to go to 192.168.0.1, enter the default admin + password (whic is actually admin & password). Find out the pi's local ip. Go to the advanced section on port fowarding. Then enable the ports i want to foward on the ip address of the item i want to foward. The pictures below may be of help

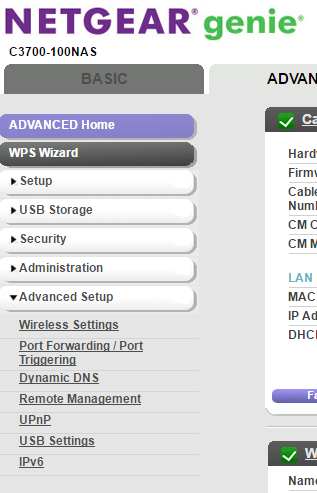

Success?
SUCCESS !?
if so, find out your external ip address. Go to http://yourip:6011/toggle+yourpersonalpassphrasehash and voila! your garage can open from anywhere in the world. Try this with your phone on LTE and see!
Front End 1
Front End
For android users out there, this is where we part unforunately. I have no Java/android dev experience. If any of you can make an equivalent app for android, that'd be INCREDIBLE!! I have a workable solution though. With Flask, you can serve static files, meaning you could make your links into a web app like this guy's solution

FrontEnd 2 - MyGarage IOS App

MyGarage
This is a native ios app i built to work with this system and similar systems with a little adaptation. If you followed everything above, this should be plug and play. Here is a video of the initial setup. I think it's absolutely gorgeous. You can make your own judgements.
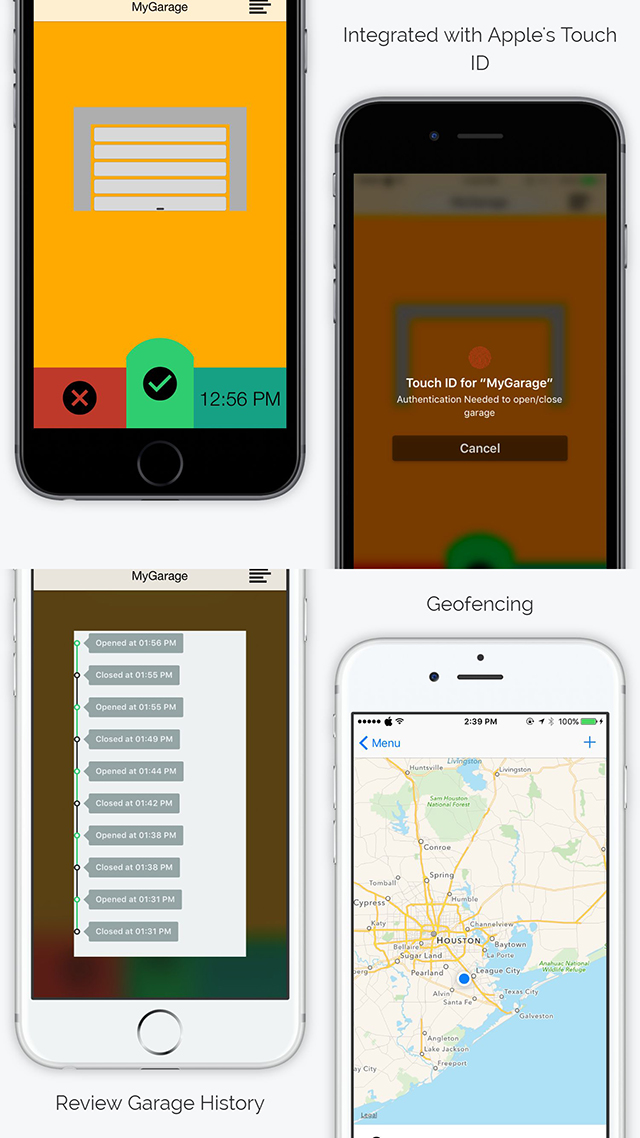
To download this app, visit the App Store
Official Description
<code>This is an app for DIYers like myself who love to tinker with stuff. This app particularly lets you control your garage with a native iPhone app.<br>
 It includes many features and benefits like

- Touch id for authentication/security

- Geofencing for closing/open the door on exit/entrance

- Allow access to close friends and family

- Setup is easy with the right backend solution

- Visual representation of garage door activity

- Very secure

- Ability to see if system is offline


Best of all, IT'S FREE!!


Backend needs as little as a toggle switch and an Open/Closed state to work.

Please refer to  http://github.com/oooseun/MyGarage  for setup instructions.


The app is completely detached from any servers other than the ones you yourself so your data isn't being beamed off to some remote location.
The End
Please leave a comment below ! Let me know if you will/won't/plan to try this out! i'm open to ideas and suggestions.
Feel free to also download the app regardless and send me an email for a test link to see how it works.
To my android users, i love you! if any android developer wants to make an android equivalent i'd be happy to share some code with you to get you started
